

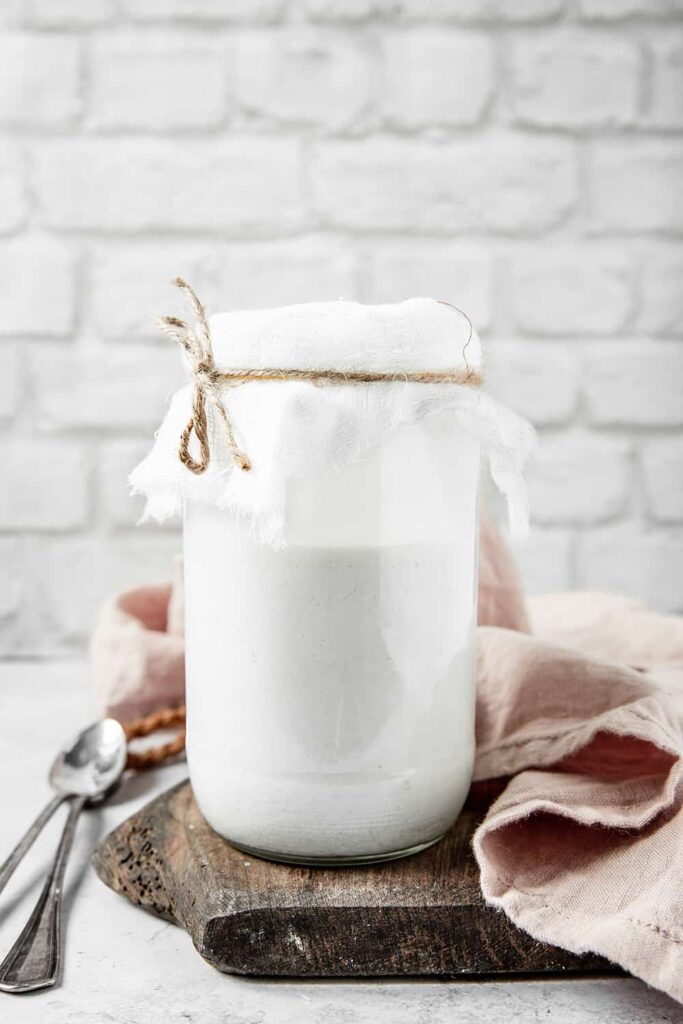
You’ll never buy store-bought coconut yogurt again after tasting this one. This 2-ingredients coconut yogurt is very easy to make, thick, rich and creamy. No fancy tricks or expensive equipment involved here, just 2 simple ingredients required, and the result is phenomenal! The perfect addition to your breakfasts and savory meals and a great way to get in some gut health probiotics. Follow the step-by-step recipe below.
This recipe is part of my new FREE ebook “Rise and Shine”. Inside, you’ll find many delicious and healthy easy breakfast recipes for everyday. From smoothie bowl to overnight oats and French toasts, there is something for any occasion. To get your free copy, simply subscribe to the newsletter below! No spam promise, only great and exclusive content for you.

Why to make your own coconut yogurt
I can’t say enough how making your own coconut yogurt is life changing. Not only it is very simple to make, fun and rewarding, but it’s also SO much better and really cost saving.
First thing, coconut yogurt is ridiculously easy to make at home. All you need is 2 ingredients and a jar. No fancy and expensive equipment, or weird ingredients. No excuses. Moreover, I think it’s a pretty fun experience to do : it is a living food and you’ll observe your yogurt evolve and change in texture and taste during the process. And that’s amazing.
Then, and maybe the most important, homemade coconut yogurt is so much better than store-bought ones. Now you can start finding very good coconut yogurt brands in stores, but they are often crazy expensive. Most of industrial coconut yogurts contain additives, sweeteners or thickeners. These are to make sure the yogurt will keep its creamy and thick texture longer once stored and can be kept longer. By making your own yogurt, you can decide exactly what you want to put in, and you’ll see that you don’t need anything else to get a rich and creamy coconut yogurt.
Last and vey significant, you will save a lot of money. Coconut yogurt is still a scarce and expensive product. The very high quality ones can reach crazy prices. However, the raw materials you need, coconut milk and probiotics, are cheap products.

Tips before you start
Here are a couple tips for you before your start to get the most of your homemade coconut yogurt :
- Make sure you are using high quality coconut milk : full fat, with the highest percentage of coconut (at least 85%) and preferably organic. Full fat will give you a thick and creamy texture while light coconut milk might give you a more liquid finished texture. For a very creamy and thick consistency similar to Greek yogurt, prefer coconut milk with natural thickeners like guar gum.
- Make sure you’re using vegan-friendly very high quality probiotics with a minimum of 50 billion live cultures.
- Note that the final result highly depends on the coconut milk and probiotics you are using. The taste and texture may vary depending on the brands and countries. I suggest to try different brands until you get the perfect combination.
- You might observe separation in the yogurt during the process, and that’s OK! Simply stir the yogurt before using to mix the layers.
- Always use wooden spoon to stir the yogurt during the activation process. A metal spoon can react negatively with the probiotics.
- Make sure the jar is perfectly clean. Bacterias and other organism could interfere with the probiotics and disrupt the process. You can easily sterilize jars by soaking in boiling water and letting dry completely.
- Check the yogurt often during the making. If it takes on weird colors or odd smells, something has gone wrong. It might be linked with the temperature or the products you’re using. Don’t consume it and try again.
How to flavor your coconut yogurt
The recipe below is given for plain unsweetened yogurt. It’s my favorite way to prepare coconut yogurt so that I have a neutral base I can use for every kind of food, sweet or savory. However, it’s possible to add different flavorings to your coconut yogurt :
- To make vanilla coconut yogurt, just add 1/2 fresh vanilla bean in the preparation during step 2, just after opening and pouring the can of coconut milk in the jar. Cut the vanilla bean in half and with a spoon scrape out the vanilla inside and add it to the coconut milk. Stir the vanilla in thoroughly until it has mixed in evenly. You can use vanilla powder or extract as well.
- To sweeten your coconut yogurt, simply add the sweetener of your choice at the very end of the process. Once the yogurt is ready, stir in some maple syrup, agave syrup, coconut sugar or any sweetener of your choice.
- To make fruit yogurt, add some fresh fruit purée to your coconut yogurt at the end of the process. I found mango, strawberry and raspberry to work very well. It brings flavor, color and natural sweetness to the yogurt.
How to consume your coconut yogurt
There are millions ways to consume coconut yogurt! It’s such an amazing product you can use everywhere, in both your sweet and savory dishes, the same way as regular yogurt or Greek style yogurt. I always make sure to have a jar ready in my fridge to add a creamy touch in all my preparations.
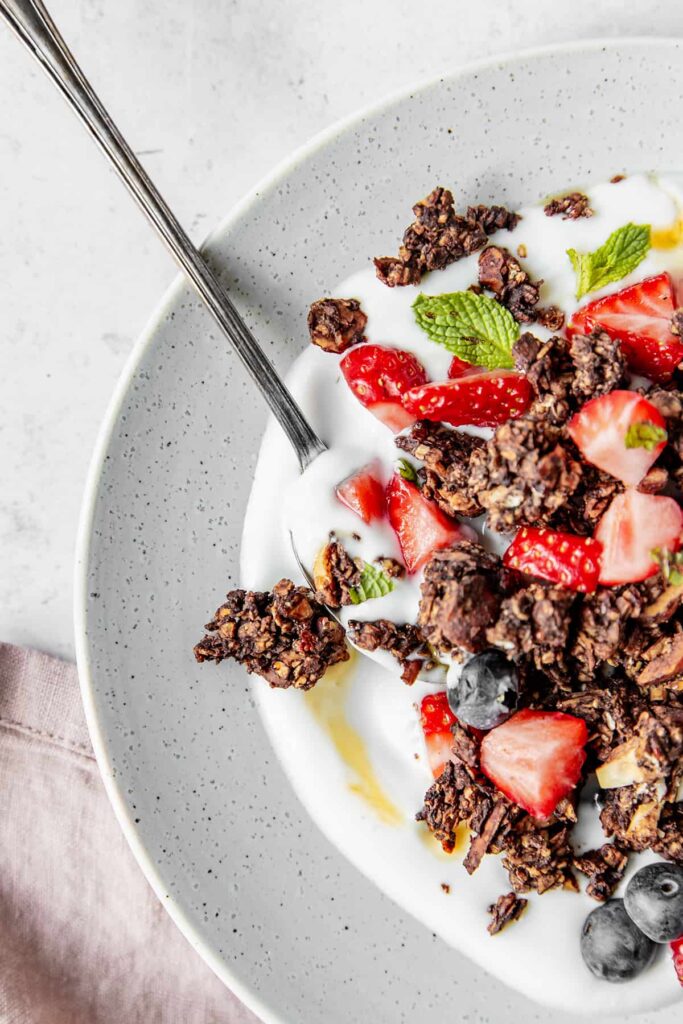
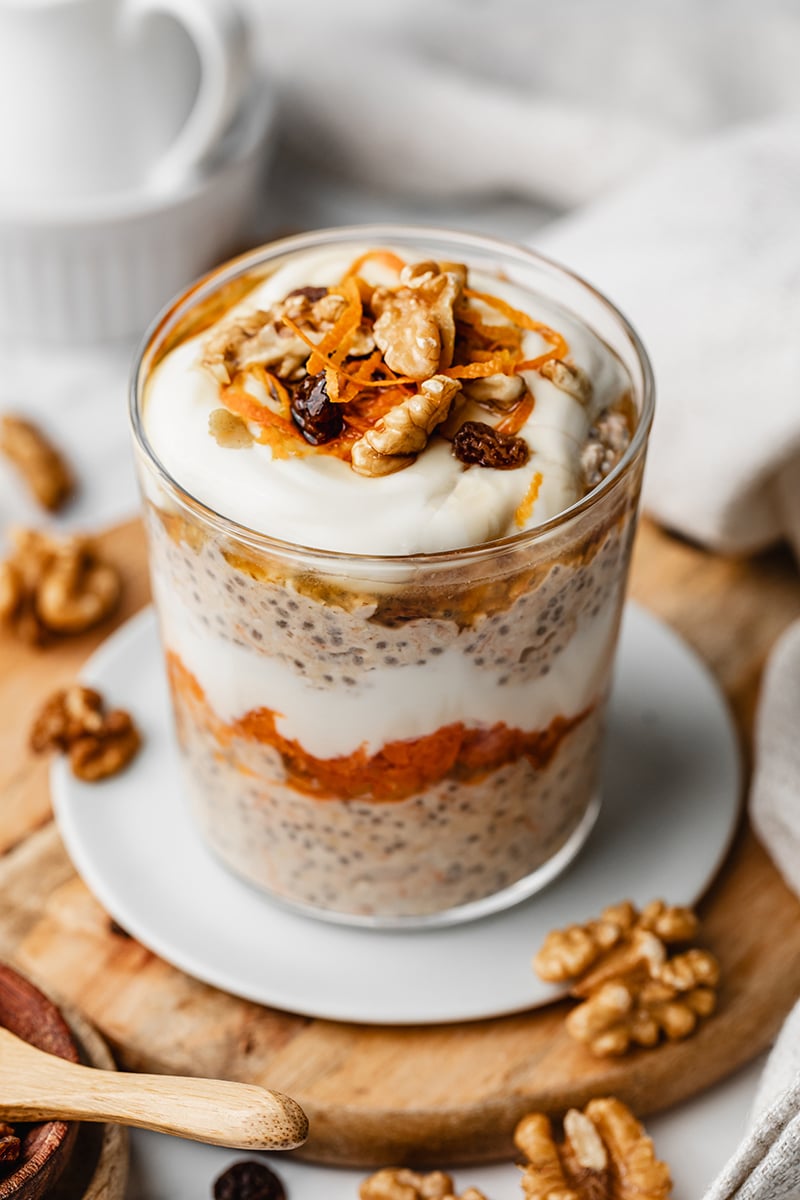
The most common is to consume coconut yogurt for breakfast. It’s a very good alternative to change up your routine of smoothie or porridge. However, coconut yogurt is a pretty rich ingredient, so I highly recommend to consume it in moderation. A little goes a long way and 4 to 5 spoonfuls are a great serving size. You can prepare a bowl with plain coconut yogurt and all the toppings of your choice, like granola, fresh fruits, compote and nuts. Coconut yogurt can also be used as a topping for your chia puddings, smoothie bowls, oatmeals or even toasts and pancakes to replace chantilly. I love to add a spoon on my warm porridge for extra creaminess.
Coconut yogurt also works very well in savory dishes. You can make dressings and dipping sauces, and use it in your preparations to add creaminess and texture. I love to add a spoon of plain coconut yogurt in my savory bowls, especially Mexican and Indian food. The softness of yogurt perfectly balance the spiciness of these cuisines. Try it on top of your curries or chili, it really makes all the difference.
Recipes that perfectly pair with your homemade coconut yogurt
- Sugar free granola cereals
- Gluten and sugar free banana pancakes
- Easy crunchy traditional granola
- Creamy quinoa porridge GF
- Peach and Blueberry crumble GF
- Chai Pear crumble
Easy 2-ingredients coconut yogurt
You’ll never buy store-bought coconut yogurt again after tasting this one. This 2-ingredients coconut yogurt is very easy to make, thick, rich and creamy.
- Prep Time: 2 days 6 hours
- Total Time: 54 hours
- Yield: 6 servings
- Category: breakfast, dessert, side
Ingredients
- 1 14-ounce can of organic full fat organic coconut milk
- 2 capsules probiotic (at least 50 billions live cultures)
Instructions
- Shake the coconut milk can before opening to ensure thorough mixing. Then open the can and pour the coconut milk into a clean dry glass mason jar.
- Empty the probiotic capsules into the coconut milk and use a wooden spoon to stir until smooth and no probiotic lumps remain. For extra precaution or if lumps of powder remain, you can mix the coconut milk in a blender for 30 seconds.
- Cover the jar with a layer of cheesecloth to allow air circulation, and secure with a rubber band or a string.
- Let activate in a warm place (at least 75F) for 24 hours.
- After 24 hours, check on the coconut yogurt : the mixture should have started to thicken. Make sure there is no particular smell or coloration. Stir with a wooden spoon to mix the top layer and homogenize. Put the cheesecloth back on the jar and let sit for an additional 24 hours.
- After 48 hours total, remove the cheesecloth and stir one last time. At this stage, the coconut yogurt should be already thick and creamy.
- Secure the jar with a lid and place in fridge to chill and thicken up for at least 6 hours. The coconut yogurt will continue to thicken until reaching a texture similar to a Greek yogurt.
- Your coconut yogurt is now ready. Enjoy plain with granola, fresh fruits or as a topping for pancakes and even savory meals like curry. You can also add a bit of sweetener like agave, maple syrup or fruit purée.
- Store covered in the refrigerator for several days. Always check the consistency and smell before consuming.
Notes
- For best results, make sure you are using high quality coconut milk : full fat, with the highest percentage of coconut (at least 85%) and preferably organic. You can use light coconut milk but the yogurt will stay very fluid. For a very creamy and thick consistency similar to Greek yogurt, prefer coconut milk with natural thickeners like guar gum.
- Make sure you’re using vegan-friendly probiotics with a minimum of 50 billion live cultures.
- Note that the final result highly depends on the coconut milk and probiotics you are using. The taste and texture may vary depending on the brands and countries. I suggest to try different brands until you get the perfect combination.
Recette version française
Cette recette est extraite de mon ebook “Rise and Shine“. Il est disponible gratuitement et contient plein d’autres recettes de petit-déjeuner sain et savoureux pour tous les jours. Pour le recevoir, inscrivez-vous simplement à la newsletter en cliquant ici. Et recevez chaque semaine de délicieuses recettes.

Yaourt au lait de coco ultra simple
Vous n’achèterez plus jamais de yaourt de coco industriel après avoir gouté celui-ci. Seulement 2 ingrédients, très facile et rapide à réaliser et super onctueux.
- Prep Time: 2 jours 6 heures
- Total Time: 0 hours
- Yield: 6 portions
- Category: dessert, petit-déjeuner, accompagnement
Ingredients
- 400ml de lait de coco entier biologique
- 2 gélules de probiotiques (au moins 50 milliards UFC)
Instructions
- Secouer énergiquement la boite de lait de coco pour bien mélanger. Ouvrir la boite et verser le lait de coco dans une jarre en verre, propre et parfaitement sèche.
- Ouvrir les gélules de probiotiques et vider tout le contenu dans le lait de coco. Mélanger à l’aide d’une cuillère en bois jusqu’à ce que la poudre soit parfaitement diluée et qu’il n’y ai pas de grumeaux. Pour plus de sécurité et si des grumeaux subsistent, passer le mélange au blender pendant 30 secondes.
- Couvrir la jarre avec un morceau d’étamine ou de tissu léger afin de permettre à l’air de circuler, et sécuriser avec un élastique ou une ficelle.
- Laisser reposer pendant 24 heures dans un endroit chaud (au minimum 24°C).
- Après 24 heures, le mélange doit commencer à épaissir et une couche épaisse a pu se former à la surface. Vérifier qu’aucune odeur ou couleur particulière ne s’est développée. Remuer avec une cuillère en bois pour homogénéiser le mélange. Replacer l’étamine et laisser reposer pendant 24 heures supplémentaires.
- Après 48 heures au total, retirer l’étamine et remuer une dernière fois. A ce stade, le yaourt doit déjà être bien épais et crémeux.
- Fermer la jarre avec un bouchon hermétique et placer au réfrigérateur pendant 6 heures. Le yaourt va continuer à épaissir jusqu’à atteindre une consistance proche de celle d’un yaourt grec.
- Votre yaourt de coco est maintenant prêt à être dégusté, nature avec des fruits frais, du granola ou en topping sur des pancakes ou des plats salés. Vous pouvez étalement ajouter un peu de sucrant à ce stade, comme du sirop d’agave ou de la purée de fruits.
- Le yaourt de coco se conserve plusieurs jours au frais. Vérifier sa consistance et sa couleur avant de le consommer.
Notes
- Pour des résultats optimaux, utiliser du lait de coco de bonne qualité : entier (non allégé), avec une teneur élevée en noix de coco (au moins 85%) et de préférence biologique. Le lait de coco allégé fonctionne également mais le yaourt obtenu restera très fluide. Pour un yaourt épais et ultra onctueux, utiliser un lait de coco qui contient déjà des épaississants naturels comme la gomme de guar.
- Vérifier que les probiotiques utilisés sont de source végétale et qu’ils contiennent au minimum 50 milliards de cellules vivantes.
- A noter que le résultat final dépend fortement du lait de coco et des probiotiques utilisés. Le goût et la consistence peuvent varier en fonction des marques et des pays. Je vous suggère de faire plusieurs tests avec différentes marques et combinaisons afin de trouver celle qui fonctionne le mieux.


This looks great! Do you have any probiotic brands that you reccomend?
Thank you Danielle! Unfortunately I don’t have a particular probiotic brand to recommend for coconut yogurt. I’m finding mine at the Organic grocery store. I tried different brands and they all worked well in this recipe.
Thank you for this simple recipe!! I’ve been making my own coconut milk yogurt for over a year now, and love it! As you say, we have much more control over the ingredients, and it’s less expensive!
I have been using the L reureri strain (tablets from Bio Gastrus) per cardiologist William Davis (he wrote Wheat Belly and Undoctored) as it’s been well researched for additional benefits – production of oxytocin and collagen, plus enhancing physical endurance for exercise!
… For two cans of coconut milk, I add prebiotics – either 2 tablespoons inulin, or more recently, a small organic potatoes, grated, then whipped with some of the milk in my food processor. (He suggests potato starch as an option) I also use a tablespoon of organic raw sugar, as coconut milk doesn’t contain enough sugar for the bacteria.
I ground tablets for the first batch, then use 1/3 C from my previous batch as starter, occasionally ‘refreshing.’ Dr D. Suggests culturing 40-48 hours in an oven that you turn on briefly throughout the cycle (it cultures best between 100-105° F)
This strain inhabits the small intestine, and was quite common in the middle of the last century, but is rarer now.
Hi Nadya! Thank you so much for your feedback and amazing information about coconut yogurt! This is very interesting as I’m always looking for new recipes and techniques to experiment! I’ve never tried adding potatoes, but that sounds amazing. I’ll definitely give it a try next time I’m making coconut yogurt. Thanks a lot 🙂