

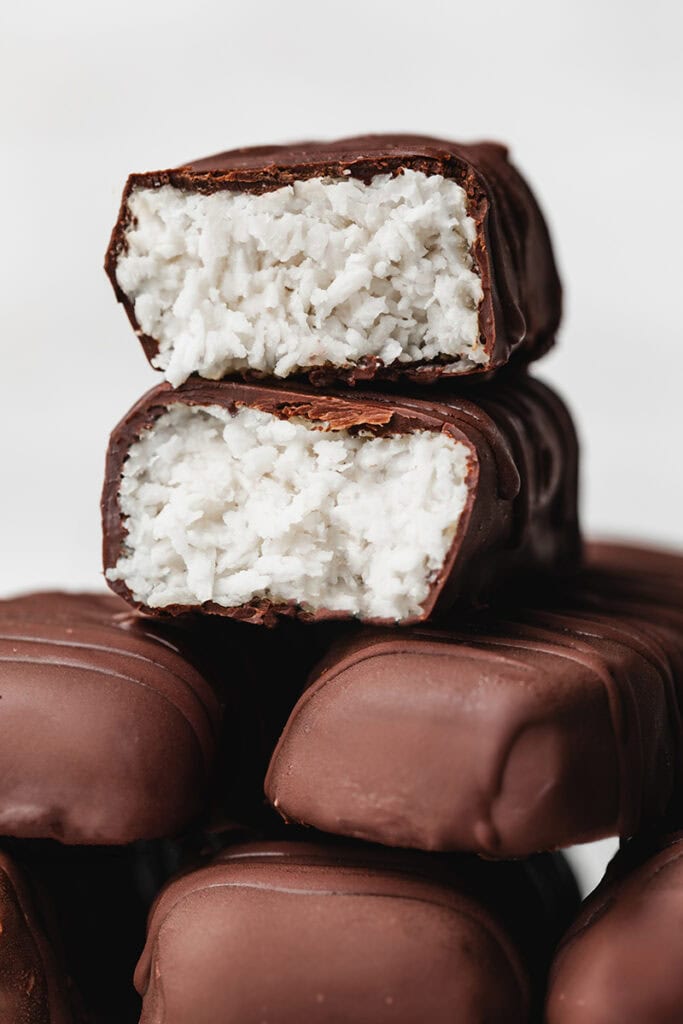
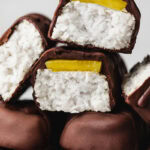
These homemade vegan Bounty bars are a healthy twist on the popular chocolate candy bar. They have a soft and chewy coconut filling, coated in dark chocolate. Quick and easy to make with only 5 simple ingredients, they are the perfect treat to keep in your fridge for a healthy snack or dessert!
A favorite healthy and natural treat
Twix, snickers, Reese, bounty, these names immediately remind memories from the childhood. The magic combination of crunchy and gooey textures, nutty and chocolate flavors, sweetness and fatness, make these iconic chocolate bars totally addictive. While I still enjoy their original version time to time, I would rather prefer something more nutritious on a daily basis. But healthier doesn’t mean less satisfying, and these homemade Bounty bars will no doubt convince the most resistant gourmets.
With only 5 natural ingredients, lightly sweetened with agave syrup, vegan and gluten free, these homemade Bounty bars are the perfect treat to satisfy your sweet tooth. They are easy to make and keep well, so they are ideal to make in advance and store in your fridge.
You will love these homemade Bounty bars because they are:
- 100% natural and delicious
- Raw, vegan, dairy-free & gluten-free
- Easy to make with only 5 ingredients
- Freezer friendly for a healthy snack ready to enjoy
- Lightly sweetened, and you can adjust the sweetness to your taste
- Kids (and adult) friendly
Ingredients for homemade Bounty
- Shredded coconut — also called grated coconut. They are grated bits of coconut that are dried out. The main difference between shredded and desiccated coconut is the size of the bits and texture. Desiccated coconut is finely ground coconut, while shredded coconut has a larger particle size and is usually tender and juicier.
- Coconut cream — as long as possible, I recommend to use the thickest, richest coconut cream/milk for the best result. The easiest solution is to buy a can of regular coconut milk (at least 85% coconut contain) and place it in the fridge overnight. Then open the can without shaking it and scoop only the thick layer of coconut cream that has formed on top.
- Agave syrup — it’s a liquid sweetener made from the agave plant. I choose to use agave syrup rather than maple syrup for these bounty bars in order to keep their beautiful white color. Indeed agave syrup has a lighter color and flavor than maple syrup, so I think better works in this recipe. But you can totally replace agave with maple syrup.
- Chocolate — we use melted chocolate to coat the bars. You can either use chocolate chips or chopped dark chocolate bars. In both case I recommend to buy a good quality dark chocolate (70% at least) for a rich and deep flavor.
- Coconut oil — adding a spoon of coconut oil to the melted chocolate makes it runnier, thus easier to coat the bars. Coconut oil is optional and you can definitely go without it, but keep in mind that the melted chocolate will likely be thicker.
Bounty bars variations
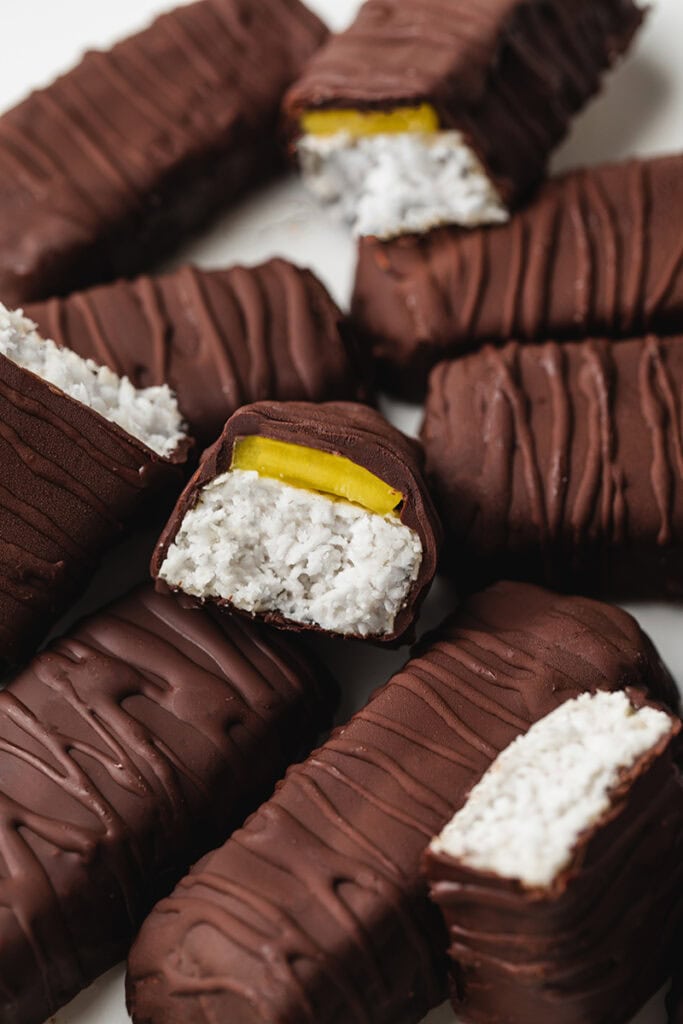
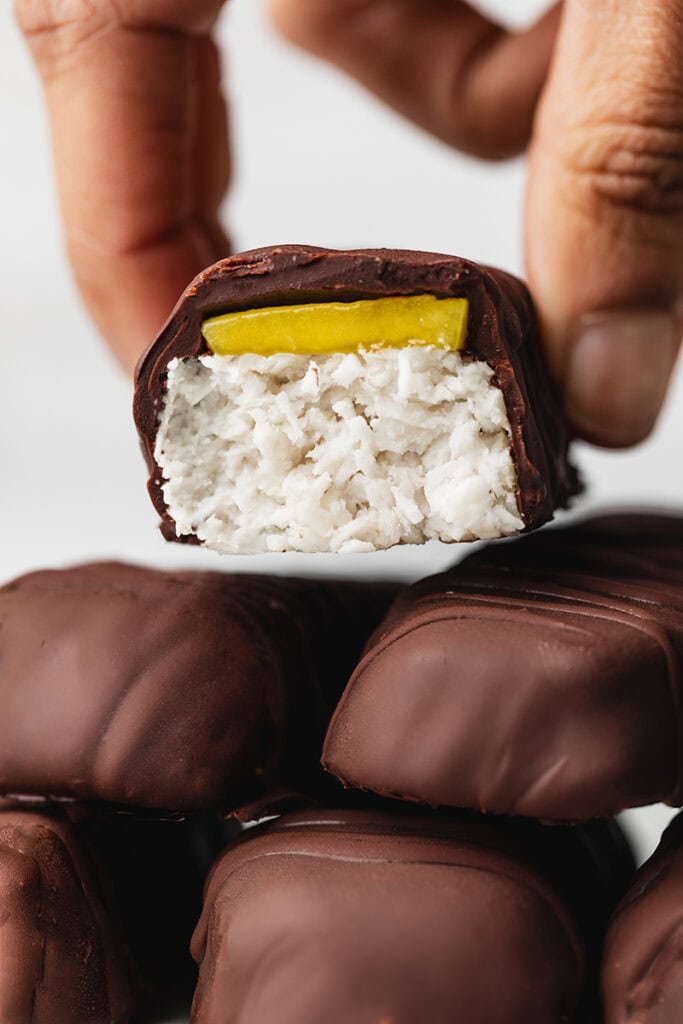
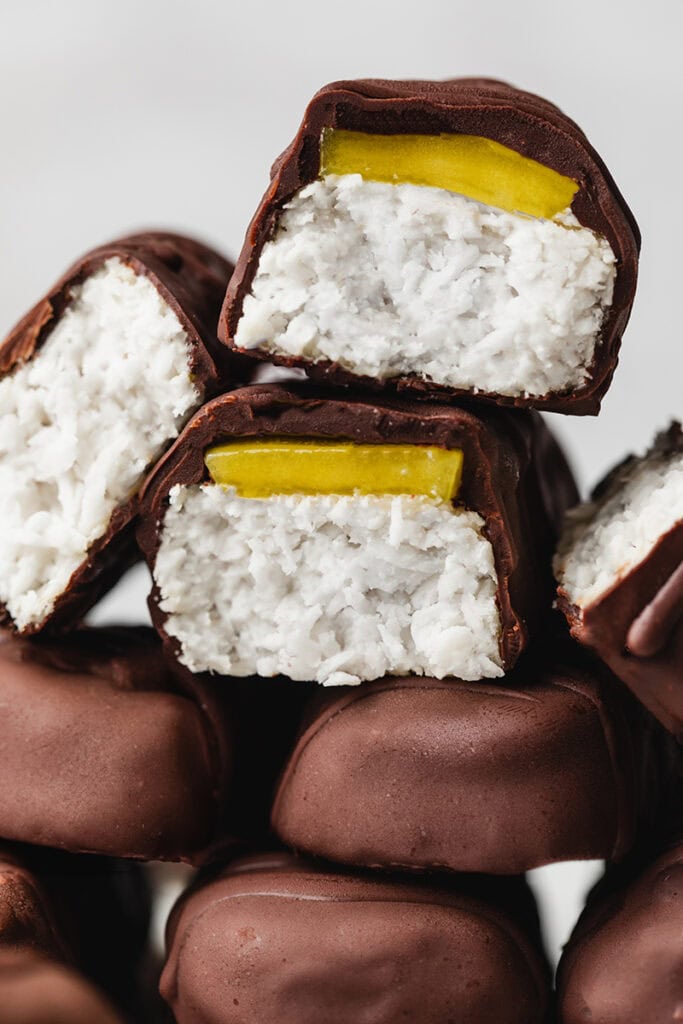
While brainstorming on a bounty bars recipe, I was wondering how to add a little twist that would make it special. Coconut and mango are among my favorite flavors, so I immediately thought about adding a slice of mango on top. I love the combination of these two exotic flavors, and the juicy mango brings a fresh fruity touch that balances the richness of the coconut. However, this is only one suggestion to personalize these Bounty bars, and there are endless possibilities.
- Original Bounty — if you’re a defender of the classics, then you can definitely omit the mango and stick to the classic coconut bounty bars. They are already delicious on their own.
- Fruity variations — replace the mango with slices of fresh seasonal fruits like apricot, peach, strawberry, kiwi, pineapple, banana, …
- Jam — instead of fresh fruits, you can spread a layer of fruit jam on top of the coconut filling. I love a homemade berry chia jam.
- Nut butter & spreads — for the ultimate comforting treat, add a layer of peanut butter or homemade coconut caramel, and some crunchy roasted nuts! Better than any store bough chocolate bar!
Bounty Bars FAQ
Is coconut cream the same as coconut milk?
This recipe calls for thick coconut cream. In some countries, you can directly find canned coconut cream at the supermarket. However, I know it’s not the case in all the countries. The idea is to use the thickest, richest coconut cream/milk. If you can’t find coconut cream, you can just buy a can of regular coconut milk (at least 85% coconut contain) and place it in the fridge overnight. Then open the can without shaking it and scoop only the thick layer of coconut cream that has formed on top.
Is this recipe gluten free?
Yes, this recipe is gluten free as long as we don’t use ingredients that contain gluten. However if you’re celiac, make sure to use ingredients that are certified free from gluten.
How long do they keep?
Homemade bounty bars are ideal to make and keep in your fridge for a healthy and delicious snack whenever you need. Store the bars in a clean and dry airtight container and keep in the fridge for 1 week, or in the freezer for 1 up to 2 months. Take the bars out of the freezer and let them thaw 5 minutes before eating.

For more homemade version of your favorite bars and treats, check out these recipes!
- Homemade Twix bars (GF)
- Snickers Date Bark (GF)
- Seven Layer Brownies (GF)
- No bake Hazelnut & Cream Slices (GF)
I love to see your creations! Don’t forget to tag me @alicepages on your photos on Instagram and give your feedback in the comments below if you make this recipe at home! Your opinion is my best reward.
PrintCoconut Bounty Bars
Quick and easy homemade vegan Bounty bars are a healthy and satisfying treat. They have a soft and chewy coconut filling coated in dark chocolate.
- Prep Time: 20 minutes
- Chill Time: 1 hour
- Total Time: 1 hour 20 minutes
- Yield: 9 bars
- Category: Dessert, Snack
- Diet: Vegan
Ingredients
- 2 cups desiccated coconut (150 g)
- 2/3 cups canned coconut cream* (150 g)
- 3 tbsp agave syrup (60 g)
- 1 pinch of salt
- 1 cup dark chocolate (6.3 oz / 180 g)
- 2 tbsp melted coconut oil
- optional: 1 mango
Instructions
- Before you start, make sure to have stored the can of coconut milk in the fridge overnight. (See the notes for more details). Open the can of coconut milk without shaking it, scoop only the thick layer of coconut cream that has formed on the surface, and measure the amount required by the recipe.
- Add desiccated coconut, coconut cream, agave and salt to a bowl, and mix until the mixture comes together. You can also use a food processor with the S blade attachment. In this case, blend for about 1 minute until the ingredients are sticking together. Chill the batter for 20 minutes in fridge. This makes it easier to shape the coconut mixture into bars.
- Then remove from the fridge, scoop out about 3 tablespoons of the mixture and press it in your hand to shape 9 bars. Place the bars side by side on a tray plate lined with parchment paper. For the mango option: peel and slice the mango. Then cut rectangles the same size of the bars, and place them on top of the bars. Freeze the bars for 30 minutes to harden.
- Meanwhile, melt the chocolate together with the coconut oil over a double boiler until completely melty.
- Remove the coconut bars from the freezer. One by one, dip each bar into the melted chocolate, using two forks or a spoon. Place the bars on a cooling rack with parchment paper underneath to harden. Then decorate with a drizzle of melted chocolate if desired.
- Return the plate in the freezer for 10 minutes to set the chocolate.
Notes
- Storage – Store the bounty bars in an airtight container in the fridge for 1 week, or freeze for up to 1 month and thaw at room temperature before eating.
- Coconut cream – Use full fat coconut cream, containing at least 85% of coconut. For best results, place the can of coconut milk in the fridge overnight. Then open the can without shaking it and scoop only the thick layer of coconut cream that has formed on the surface. Keep the watery part for an other use.
Recette version Française
PrintBarres Bounty Vegan
Ces barres chocolatées à la noix de coco sont très faciles à réaliser avec seulement 5 ingrédients. Moelleuses, gourmandes et délicatement sucrées, elles sont parfaites pour un en-cas ou un dessert sain et satisfaisant.
- Prep Time: 20 minutes
- Temps de repos: 1 heure
- Total Time: 1 heure 20 minutes
- Yield: 9 barres
- Category: Dessert
- Diet: Vegan
Ingredients
- 150 g de noix de coco râpée
- 150 g de crème de coco* (voir notes)
- 60 g de sirop d’agave
- 1 pincée de sel
- 180 g de chocolat noir
- 2 cuil. à soupe d’huile de coco
- optionnel: 1 mangue
Instructions
- Avant de commencer, assurez-vous d’avoir préalablement placé la boîte de crème / lait de coco au réfrigérateur pendant toute une nuit. (Voir les Notes pour plus de détails). Ouvrir la boîte sans la secouer et prélever uniquement la couche de crème épaisse qui s’est formée en surface. Mesurer la quantité de crème de coco demandée dans la recette.
- Verser la noix de coco râpée, la crème de coco, le sirop d’agave et le sel dans un saladier, et mélanger jusqu’à la formation d’une pâte compacte et légèrement collante. Vous pouvez également utiliser un robot mixeur pour former la pâte. Placer la préparation 20 minutes au frais.
- Ensuite, prélever une portion de pâte et former une barre en la pressant avec les doigts. Former ainsi environ 9 barres, et les déposer côte à côte sur une plaque chemisée de papier cuisson. Pour la version à la mangue: peler et couper des fines tranches de mangue. Puis découper des petits rectangles de la taille des barres et les déposer au dessus de chaque barre. Placer les barres 30 minutes au congélateur
- Pendant ce temps, faire fondre le chocolat avec l’huile de coco au bain marie.
- Sortir les barres du congélateur. Une par une, tremper les barres dans le chocolat fondu pour les enrober entièrement. Déposer les barres sur le plat, et décorer d’un filet de chocolat fondu (optionnel).
- Placer au congélateur 10 minutes pour que le chocolat durcisse.
Notes
- Conservation – Au réfrigérateur dans une boîte hermétique pendant 1 semaine, ou jusqu’à 1 mois au congélateur dans un sac congélation. Sortir les barres à température ambiante 5 minutes avant de déguster.
- Crème de coco – Utiliser de la crème / lait de coco entier, à teneur minimum 85% de noix de coco. Placer la boîte de conserve de crème de coco au frais la veille, pendant toute une nuit, puis récupérer uniquement la couche épaisse qui s’est formée au dessus.


0 Comments